3 Rounds:
5 Wall Walk, Hold Hollow 10 sec
10 Candle Stick Rolls
12 Strict Toes To Bar
Run 1 mile with a 45/25# plate for time.
Each time you stop or put the plate down, perform to ground to overheads with the plate.
Rx+
Run with a 80/50# sandbag and do 10 burpees if you stop or put the bag down.
 Tammy Johnson has been training with us for years now, but for various reasons, she has struggled to build adequate strength. As a former elite level swimmer, Tammy has racked up her share of injuries which have lead to some mobility issues especially in the knees and ankles. Tight ankles, unusually long femurs, and some knee cartilage issues have made squatting quite challenging for Tammy. The good news is, we have some other options for her. You might be wondering what the heck is going on with the contraption in the above picuture. Let me do a little explaining.
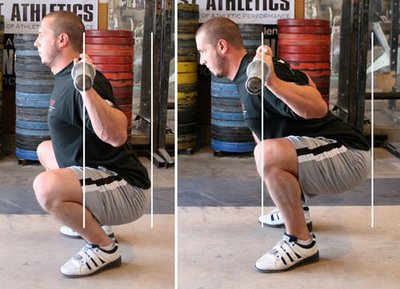
The shot on the left shows an Olympic style squat with good ankle mobility and on the right depicts what the squat would look like with poor ankle mobility.
Picture stolen from www.performancemenu.com
In CrossFit athletes are mainly taught an Olympic style of squatting. The Olympic style of squatting employs a somewhat narrow stance that requires great hip and ankle mobility in order to achieve and upright body position which is required to support the bar in the front squat or overhead squat for your cleans and snatches. If you have limited ankle flexion, the knees cannot move forward with the heels remaining on the floor. If the knees cannot translate forward in the Olympic squat the hips must move way back which puts the spine in a terribly forward leaned position. The main reason Olympic lifting shoes are so helpful is because they elevate the heel reducing the demands on the ankle to go into flexion. With a forward leaned spine you probably can’t squat very much, and you have trouble getting your hips stronger. In a quad dominant athlete like Tammy with tight ankles is it nearly impossible to squat below parallel without all her weight shifting onto her toes and irritating her knees more.

Many powerlifters use a very wide stance as shown here to keep their spine upright.
Picture stolen from www.supertraining.tv
So what can we do? Well, we work on that ankle mobility every day to start with, and we find other ways to get strong. In the powerlifting style of squatting the lifter can take a much wider stance and spread the knees much wider than in the Olympic style of squat in order to maintain an upright torso. Luckily, Tammy has great hip mobility and can get into this position beautifully. By pushing the femurs straight out to the sides, the hips can come straight down without being pushed back, and the spine can remain erect. This style of squat carries much more load in the glutes and hamstrings which takes pressure off the knees. The knees also do not bend as far to reach the bottom of the squat position. We hope that over time Tammy can build more strength in the posterior which will help balance out the tension around those old knees, and if she can get better ankle mobility she should be able to also perform the Olympic style of squat with much more success than she has in the past. If she cannot get better ankle mobility, at least we can get her much stronger than before using this style of lifting.
So lets talk a bit about the contraption going on here. First thing is the bar. The safety squat bar sits on your shoulders like a yolk and offsets the weight towards the front of the body. This bar increases the demands on the midsection and upper back to help build more mid-line stability. There are other reasons to use this type of bar that I won’t go into here, but that is the main reason we selected the safety bar for Tammy to start with.
Next is the box. When squatting without a box like you are all accustomed to, you stretch out your muscles and tissues on the descent of the squat, loading the tissues like a spring. When you change directions to move back upward, you can return some of that stored energy to help complete the lift. When you sit down on the box in a box squat, that stored energy dissipates, and you must re-create all the force needed to complete the lift. So essentially breaking up the eccentric/concentric chain requires that your muscles produce more force to overcome the weight. The cushion on the box is something I used to help Tammy get the sensation of where the box is earlier in the descent. It lso gives a bit of assistance out of the bottom helping the lifter stay in a good position.
The bands around the bar hanging down from the top of the squat rack are assisting Tammy in lifting the bar. Why not just use less weight you might ask. For one, the safety squat bar weighs 70# by itself which is too much weight to teach Tammy this exercise with. Second, the bands offer what is known as accommodating resistance, or variable resistance. As the lifter descends into the hardest part of the squat, aka the bottom, the bands stretch farther and they assist more. As the lifter stands up and gets the weight moving, the assistance from the bands decreases causing the lifter to have to continue to produce high forces to finish the lift. When lifting sub-maximal weights without accommodating resistance, once you get the weight moving and create momentum, your muscles do not have to continue to produce maximal forces to keep the weight moving. So basically, accommodating resistance, aka bands or chains, force the lifter to have to produce significantly more force throughout the entire range of motion to finish lifts. Whether or not the bands are ASSISTing the lift or RESISTing the the lift, the effect is the same. The difference is only that if the bands were resisting the lift, we would have to use much less weight, which would not be possible with this particular bar. When Tammy gets stronger, we will use the bands the other way. Basically using accommodating resistance builds more explosiveness by making you activate more muscle fibers, which in turn leads to greater strength gains.
So, I know that was a lot of werds and I know some of you have the attention span of a gnat, but for those of you who were interested, I wanted to do a little explaining about what the heck goes on in that scary corner of the gym where you see Travis and I using powerlifting techniques with our athletes. I also hope to enlighten you a bit how some of this stuff can be highly effective in helping all types of athletes, and can be applied to overcome different weaknesses. There is a lot going on in the picture above, and it looks like a frickin’ circus, but each of these pieces of equipment and techniques has its place in creating better movements and stronger athletes.
This day was about introducing Tammy to a new way of moving and using equipment that is highly effective in assisting with the process. This stuff will allow Tammy to work around her limitations and fix some of her imbalances. As Tammy progresses in strength, and you will see her progress, you will likely see many different things going on over in the corner. If you are interested in learning more about how this stuff works, how it might apply to you, or getting some coaching on powerlifting, talk to one of us and we will help get you going. This type of specialty equipment along with these techniques and lifts have been paramount to Travis and I in our continued development as athletes, and have been even more effective in helping our athletes get the most out of their training. To quote our good buddy, Mark Bell, “When you’re trying to get strong, you can’t go wrong. Strength is never a weakness. And that is it.”
Please list any thoughts or questions pertaining to this article to the comment section, that way I might actually know which of you actually reads this stuff.